This enchilada recipe is cheesy, comforting, and makes a delicious casserole to take to anyone who just had a baby, or needs a little pick-me-up. They’re also perfect to freeze and make ahead for busy weeknight dinners!
Hi friends! Happy Monday! How was the weekend? I hope you had a wonderful one. We had so many fun adventures – a girls’ night, a date night, park time, a zoo field trip, crepes, and a soccer game! – but the weekend started off with taking a baby meal to a good friend. We’ve known him since our first move to North Carolina; pretty much our whole military life. I was so excited when they welcomed a gorgeous baby girl into the family, and of course I signed up to bring a baby meal to celebrate.

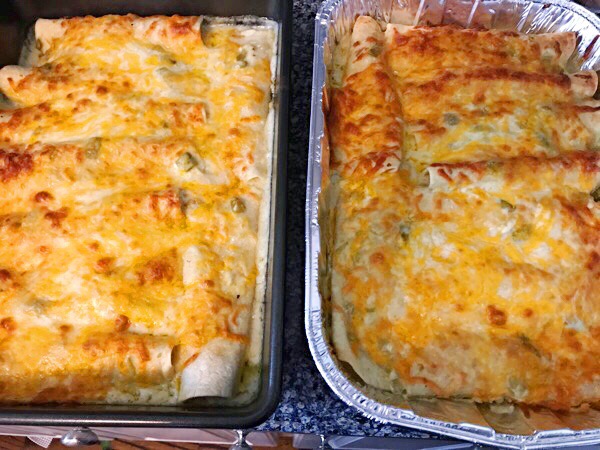
I can’t believe that I haven’t shared my go-to enchilada recipe on the blog!! This is purely accidental. I want to post it every single time I make them, but they’re eaten quickly and I usually make them at night, so with the yellow light, it doesn’t make the prettiest photos. I decided to just post it with the iPhone photos I took so you guys can have it!
This is the recipe I always make. The girls request enchiladas at least once a month and crush them every time, and it’s my standard baby meal. I feel like maybe I should switch up my baby meal menu because pretty much everywhere you look in Tucson, an enchilada stares you in the face. But, if it ain’t broke, don’t fix it. And these beauties definitely ain’t broke.
This recipe seems like a lot of steps, but the more you make it, the easier and faster it happens. Just trust the process; it’s worth it. Put on some Juanes radio on Spotify, pour a little wine, and go for it! This recipe makes a double batch, so definitely make a pan for yourself and one to gift to a neighbor, a friend, someone with a new baby (they really need enchiladas!) or wrap and put it in the freezer. You’ll thank yourself later.

Important: chicken and tortillas matter. For the chicken, I always use store-bought rotisserie chicken. It has the most flavor and best texture. The best part is that you don’t waste 100 years grilling and baking your chicken. And don’t even boil it unless you want the chicken to taste like white, chewy rubber, mmmm k?
As far as the tortillas go, I try to get as close to homemade as possible. When I’m feeling extra, I use the frozen fresh tortillas from Costco. You cook them on the griddle until they’re lightly golden brown and your whole house will smell amaaaaazing. The best part about making your own: enjoy them warm with a little butter and jam, rolled up, and they’re pretty much the best thing ever. (We call them “jam things” in our family and it’s a tradition from when you’re about two until forever.) If you don’t have homemade, don’t worry!! Just make sure to get the ones with a paper label on the inside (this means they’re legit) like Alejandro’s brand. Also, don’t be afraid to feel the tortillas before you put them in your cart. Make sure they’re soft and nice! You can use corn tortillas, but I find that the flour ones give it a better texture.

(This pic was from a batch I made a couple of years ago! They got a little toasty under the broiler.)
Here’s the recipe! I hope you love it.
.tasty-recipes-image
float: right;
.tasty-recipes-yield-scale
border: 1px solid #979599;
border-radius: 2px;
color: #979599;
margin-left: 3px;
padding: 0 4px;
font-size: 0.7rem;
.tasty-recipes-scale-container
float: right;
padding: 0 0 1rem;
.tasty-recipes-scale-container .tasty-recipes-scale-label
text-transform: uppercase;
font-size: 0.6rem;
color: #979599;
.tasty-recipes-scale-container button
background: transparent;
border: 1px solid #979599;
border-radius: 2px;
color: #979599;
margin-left: 5px;
padding: 2px 4px;
.tasty-recipes-scale-container button.tasty-recipes-scale-button-active
color: #353547;
border-color: #353547;
.tasty-recipes-scale-container button:focus
outline: none;
.tasty-recipes-print-button
background-color: #666677;
display: inline-block;
padding-left: 1em;
padding-right: 1em;
padding-top: 0.5em;
padding-bottom: 0.5em;
text-decoration: none;
a.tasty-recipes-print-button
color: #fff;
a.tasty-recipes-print-button:hover
color: #fff;
.tasty-recipes-rating.tasty-recipes-clip-10
-webkit-clip-path: polygon(0 0, 10% 0%, 10% 100%, 0% 100%);
clip-path: polygon(0 0, 10% 0%, 10% 100%, 0% 100%);
.tasty-recipes-rating.tasty-recipes-clip-20
-webkit-clip-path: polygon(0 0, 20% 0%, 20% 100%, 0% 100%);
clip-path: polygon(0 0, 20% 0%, 20% 100%, 0% 100%);
.tasty-recipes-rating.tasty-recipes-clip-30
-webkit-clip-path: polygon(0 0, 30% 0%, 30% 100%, 0% 100%);
clip-path: polygon(0 0, 30% 0%, 30% 100%, 0% 100%);
.tasty-recipes-rating.tasty-recipes-clip-40
-webkit-clip-path: polygon(0 0, 40% 0%, 40% 100%, 0% 100%);
clip-path: polygon(0 0, 40% 0%, 40% 100%, 0% 100%);
.tasty-recipes-rating.tasty-recipes-clip-50
-webkit-clip-path: polygon(0 0, 50% 0%, 50% 100%, 0% 100%);
clip-path: polygon(0 0, 50% 0%, 50% 100%, 0% 100%);
.tasty-recipes-rating.tasty-recipes-clip-60
-webkit-clip-path: polygon(0 0, 60% 0%, 60% 100%, 0% 100%);
clip-path: polygon(0 0, 60% 0%, 60% 100%, 0% 100%);
.tasty-recipes-rating.tasty-recipes-clip-70
-webkit-clip-path: polygon(0 0, 70% 0%, 70% 100%, 0% 100%);
clip-path: polygon(0 0, 70% 0%, 70% 100%, 0% 100%);
.tasty-recipes-rating.tasty-recipes-clip-80
-webkit-clip-path: polygon(0 0, 80% 0%, 80% 100%, 0% 100%);
clip-path: polygon(0 0, 80% 0%, 80% 100%, 0% 100%);
.tasty-recipes-rating.tasty-recipes-clip-90
-webkit-clip-path: polygon(0 0, 90% 0%, 90% 100%, 0% 100%);
clip-path: polygon(0 0, 90% 0%, 90% 100%, 0% 100%);
.tasty-recipes-nutrition ul
list-style-type: none;
margin: 0;
padding: 0;
.tasty-recipes-nutrition ul:after
display: block;
content: ‘ ‘;
clear: both;
.tasty-recipes-nutrition li
float: left;
margin-right: 1em;
.tasty-recipes-plug
text-align: center;
margin-bottom: 1em;
display: flex;
align-items: center;
justify-content: center;
.tasty-recipes-plug a
text-decoration: none;
box-shadow: none;
.tasty-recipes-plug a img
width: 150px;
height: auto;
margin: 5px 0 0 8px;
display: inline-block;
@media print
.tasty-recipes-no-print,
.tasty-recipes-no-print *
display: none !important;
/* Tasty Recipes simple recipe card styles */
.tasty-recipes-display
border: 0.15em solid #ededed;
padding: 1.5em;
margin-bottom: 1em;
.tasty-recipes-plug
margin-bottom: 1em;
.tasty-recipes-display ul,
.tasty-recipes-display ol
margin-left: 0;
.tasty-recipes-display h2
font-weight: 400;
text-transform: lowercase;
padding-top: 0;
.tasty-recipes-details
font-size: 0.8em;
.tasty-recipes-label
color: #797B7C;
.tasty-recipes-details ul li
list-style-type: none;
.prep-time, .total-time, .cook-time
display: inline-block;
width: 20%;
margin: 0.8em 0;
vertical-align: top;
.tasty-recipes-print-button
margin-top: 0.5em;
margin-right: 0.5em;
padding: 0.5em 1em !important;
float: right;
font-size: .9em;
font-weight: 800;
background-color: #797B7C !important;
border: none !important;
.tasty-recipes-image
border-left: 1.5em solid rgba(0,0,0,0);
.tasty-recipes-rating a
text-decoration: none;
.tasty-recipes-rating p
margin-bottom: 1rem;
display: inline-block;
.tasty-recipes-rating .rating-label
font-style: italic;
font-size: 0.8em;
.tasty-recipes-notes
margin-bottom: 1rem;
.tasty-recipes-nutrition
padding: 0.5em;
border-top: .15em solid #ededed;
.tasty-recipes-nutrition ul
text-align: center;
.tasty-recipes-nutrition ul li
list-style-type: none;
font-size: 0.8em;
margin-left: 0;
width: 30%;
.tasty-recipe-ingredients h3,
.tasty-recipes-ingredients h3,
.tasty-recipe-instructions h3,
.tasty-recipes-instructions h3,
.tasty-recipes-notes h3
font-weight: 200;
margin-top: 0.6em;
margin-bottom: 1.2em;
text-transform: lowercase;
.tasty-recipe-ingredients h4,
.tasty-recipes-ingredients h4,
.tasty-recipe-instructions h4,
.tasty-recipes-instructions h4
font-size: 1.2em;
font-weight: 700;
text-transform: lowercase;
color: #797B7C;
.tasty-recipes-description p
font-size: .8em;
font-style: italic;
.tasty-recipes-nutrition h3
font-size: 1em;
text-align: center;
margin-top: 1em;
.tasty-recipes-notes h3
font-size: 1.2em;
.tasty-recipes-notes p,
.tasty-recipes-notes ul
font-size: 0.8em;
.tasty-recipes-keywords p
font-size: .8em;
margin-top: 1em;
margin-bottom: 1em;
.tasty-recipes-entry-footer
text-align: center;
padding-top: 1rem;
.tasty-recipes-entry-footer p
margin-bottom: 0;
.tasty-recipes-source-link
text-align: center;
The best cheesy sour cream enchiladas
These are savory and creamy green chili and sour cream enchiladas. Make these in advance to enjoy later in the week, or share them with friends who just had a baby! I hope you love these.
- Prep Time: 20 minutes
- Cook Time: 30 minutes
- Total Time: 50 minutes
- Category: Mexican food
- Method: Casseroles
- Cuisine: Mexican
Ingredients
2 rotisserie chickens, shredded
16-20 fresh flour tortillas
2 small cans of mild green chilies (8 oz total)
1 heaping teaspoon dried oregano
1/4 teaspoon cumin
4 cloves of garlic
4 tablespoons butter
1/4 cup flour
32 oz chicken broth
8 oz sour cream
5 oz red enchilada sauce (1/2 can)- this is optional but adds awesome flavor to the sauce
32 oz Mexican shredded cheese
Salt and pepper
Chopped fresh cilantro, to garnish
Instructions
Place the shredded chicken into a large bowl. Preheat the oven to 375 and grab two 13×10 inch casserole dishes.
Heat a large saucepan to medium. Add a splash of olive oil, the garlic and green chilies, and stir until fragrant, 1-2 minutes.
Add the oregano, cumin, and butter, and allow the butter to melt completely.
Stir in the flour and cook for about 1 minute (to get rid of the flour taste), then whisk in the broth. Bring the heat up to high, until bubbling, and continue to whisk. When there are no lumps, remove from the heat. Stir in the sour cream and whisk until smooth. Stir in the red enchilada sauce. Season well with salt and pepper.
Add a couple of ladles of sauce to the chicken and a couple of handfuls of cheese. This isn’t exact; you just want the chicken to be moist and cheesy.
Ladle some sauce onto the bottom of each casserole dish – just enough to cover the bottom.
Heat your tortillas in the microwave for 20-30 seconds, until soft.
Start with one tortilla and fill with chicken along the middle portion of the tortilla. You don’t want to add too much chicken; just add enough for a serving. Roll up the tortilla and place seam-side down in the casserole dish. Continue with the rest of the tortillas and chicken. You’ll have 8-10 enchiladas in each pan.
Cover the enchiladas with sauce, making sure that no tortilla is left uncovered. Next, cover completely with cheese. Be super generous here.
Cover the casseroles with foil and bake for 30 minutes until bubbling. To brown the cheese, remove the foil and broil for 2-3 minutes (just keep an eye on it).
Serve with fresh chopped cilantro on top!
Keywords: enchiladas, green chili enchiladas, sour cream enchiladas, best enchilada recipe
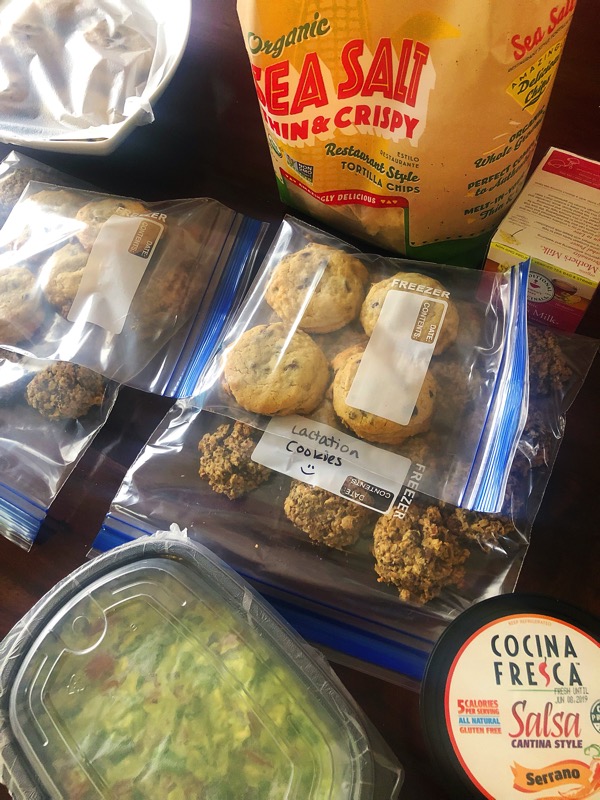
I always pack these up with salsa, chips, homemade guac, Instant Pot Mexican Rice, beans (these need their one post, too!), and for this particular baby meal, I added a margarita mix, bottle of tequila, and a few limes.
What’s your favorite comfort food? If your friend has a baby, what’s your go-to meal recipe? I’m always looking for new ideas! I also love to make lactation cookies for new mamas, too.
Happy Monday!
xo
Gina
The post The best cheesy sour cream enchiladas appeared first on The Fitnessista.


 recipe details

 #shorts #springrolls #indianstreetfood


Thanks! Share it with your friends!
Tweet
Share
Pin It
LinkedIn
Google+
Reddit
Tumblr